Can You Make Beer Can Chicken in the Oven? Yes, You Can!
If you’re not familiar with “beer can chicken”, it’s a method of roasting a chicken that infuses the chicken with beer (or another liquid) to create a crispy on the outside and juicy on the outside chicken.
Many recipes show beer can chicken on the grill (that links to our recipe and you`ll see it`s a little harder to control how the skin cooks), but you can also make it in the oven. That’s exactly what we’re going to do with this recipe.
• 1 whole chicken
• 1 can of beer (see below for more ideas)
• Dry or wet rub of your choice (see below for ideas)
To Beer or Not to Beer
Any type of beer can make an excellent beer can chicken, but you don’t have to limit yourself to beer. You can also use root beer, Coke or experiment with other sodas. Or simply take an empty can and create your own flavored liquid. For example, squeeze mandarin oranges and drop them in the can and top with water to ¾ full. Or add a combination of lemon juice, herbs and some water. It’s really up to you.
Dry and Wet Rub Ideas
Rubs are a very personal choice and it’s actually fairly easy to create your own, using the seasonings you like best.
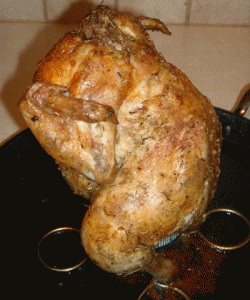
The rub shown in the photo is made with 3 tablespoons of olive oil; 1 teaspoon each of dried thyme, rosemary and sage; a bit of salt and pepper; and 1 clove of garlic. Just mix it all together and rub all over the chicken.
You can also make a dry rub by combining ¼ cup paprika; 1 teaspoon each of kosher salt, pepper onion salt and pepper; and 1 tablespoon each of white and brown sugar. Rub the chicken with a bit of olive oil and then coat the chicken with the dry rub.
Step 1: Preheat Oven
Preheat your oven to 375 F. You may have to remove the second rack in your oven and move the other rack lower, so that they chicken will fit in while standing upright.
Step 2: Apply Rub
In a large bowl, apply your rub of choice all over the chicken. Rub under the wings, legs and even inside the cavities. If you’re using a dry rub, rub a little olive oil on your bird before starting.
Leave the chicken in the bowl until you’re ready to place it on your can.
Step 3: Get Your Can Ready
Whether you’re using a beer can, soda pop or creating your own liquid, make sure the can is only about ¾ full. Place the can on a baking sheet or oven-safe griddle. You can also purchase a holder for your can to keep in place (there is one in the photo above). It’s not necessary, but if you don’t have one, you’ll have to be extra careful to prevent tipping.
Step 4: Place Your Chicken on the Can
Now you’re ready to place the chicken over the can. Open the rear cavity of the chicken and carefully place it over the can, so only about an inch of the can is showing.
Step 6: Bake
Place the chicken in the oven and roast to an internal temperature of 165 F. Depending on the size of your chicken, this can take about 75-90 minutes or so. Once the chicken has reached the appropriate internal temperature, let it rest for about 10-15 minutes before serving.


